How to Harvest and Germinate Clivia Seeds: A Gardener’s Guide to Blooming Success
If you’re anything like me, you find a special kind of joy in coaxing a seed to life and watching it bloom. For clivias, this process feels like nurturing a little miracle. The vibrant flowers that brighten up my garden are a daily reminder of the magic that starts with a tiny seed. But here’s the thing: how beautiful those blooms become hinges largely on how well you harvest, store, and germinate your clivia seeds. Trust me, there’s more to it than just plopping seeds into the soil!
Let’s dive into the art and science behind harvesting and germinating clivia seeds, so you can fill your garden (and your heart) with these stunning, sun-kissed flowers.
The Secret Life of a Clivia Seed

I like to think of seeds as tiny potential powerhouses. Each one carries the DNA for the entire plant, just waiting to unfurl into something magnificent. And this couldn’t be more true with clivia seeds. Clivia, a striking orange-hued flowering plant from the Amaryllidaceae family, is native to South Africa. It’s known for its vibrant color and ability to brighten up even the darkest corners of the house or garden.
Currently, there are six species of clivia, along with various hybrids offering shades from pale yellow to deep red-orange. And while those colorful blooms are the end goal, the journey begins with careful harvesting of the seeds.
Harvesting Clivia Seeds: Patience Pays Off
If you’re thinking you can just scoop up some seeds and toss them in the ground, think again. Clivia seeds demand a little more TLC (tender loving care) than your average plant. But the rewards are worth it. Here’s a breakdown of how to harvest clivia seeds like a pro:
Step-by-Step Guide to Harvesting Clivia Seeds
- Pollination Phase
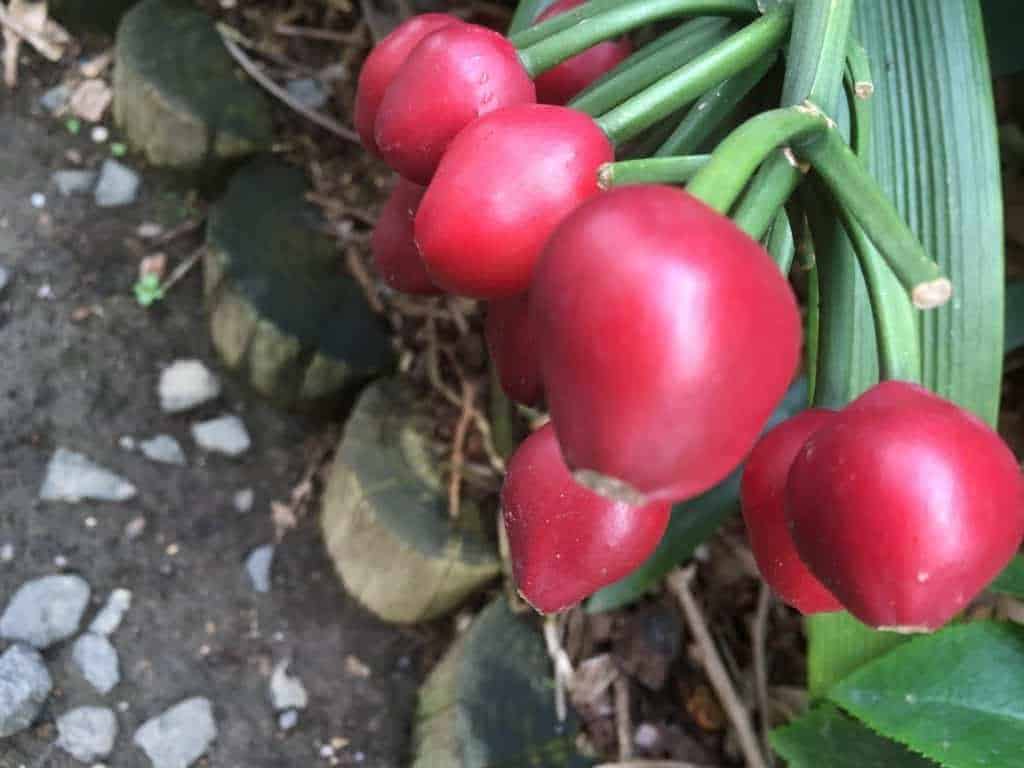
After pollination, clivia flowers naturally fall off, revealing a round, swollen berry-shaped ovary. This is where the seeds begin their journey. - Maturation Period
Be prepared to wait—clivia seeds are in no rush. It can take around 9 to 10 months for the ovary to mature into a full seed pod. That’s right, nearly a year! The pod changes colors as it matures, transitioning from green to yellow, red, or even orange. When it feels soft to the touch, you know it’s ready. - Seed Extraction
Once the pod is soft and its color has shifted, it’s time to harvest. Gently pick the pod and carefully cut it open. Inside, you’ll find the seeds nestled in a soft pulp held together by thin membranes. Remove the seeds from the pulp and wash them under running water—this is where a germicidal solution can come in handy to prevent any unwanted bacteria. - Storage Tips
After a thorough wash, store your seeds in a sealed plastic bag with a few drops of water to maintain humidity. Remember: clivia seeds aren’t marathoners; they don’t last long. Keep them at room temperature, and never freeze them. It’s best to sow them fresh, as storing them for more than two months can reduce their viability.
| Harvesting Tips | Do | Don’t |
| When to Pick | When the pod is soft and has changed color | Pick when still green |
| How to Store | Sealed plastic bags with a few drops of water | Freeze or store for more than 2 months |
| Ideal Conditions | Room temperature, high humidity | Let them dry out |
Germinating Clivia Seeds: Watch the Magic Happen

Now that you’ve got your seeds, the fun begins! Germinating clivia seeds isn’t difficult, but it does require some attention to detail. Think of it like following a good recipe—if you miss a step, you might end up with something less than perfect.
Conditions for Germination
Clivia seeds like to be pampered. Here’s what they need to sprout:
- Temperature: Keep the environment warm, ideally between 73°F and 77°F. Anything cooler, and you might end up waiting much longer for those little shoots.
- Humidity: High humidity is key. It’s like giving the seeds a cozy blanket to keep them comfortable while they wake up.
- Sterility: Always start with sterile conditions to prevent any disease from ruining your batch.
Germination Steps
- Preparation
Start by prepping a damp compost mix. I like to add some perlite or vermiculite to boost drainage and aeration. It’s like giving your seeds the best possible start in life. - Bag It Up
Place the compost and a few seeds in a sealed plastic bag, pressing the seeds slightly into the mix with the seed’s pointy end facing upward. This helps ensure proper sprouting orientation. The plastic bag acts like a mini-greenhouse, locking in the moisture needed for germination. - Find a Dark, Warm Spot
Put the bag somewhere warm and dark. I usually tuck mine in a drawer or cupboard—someplace where the seeds won’t be disturbed. In a couple of weeks, you’ll start to see them sprout. - Transfer to Seed Trays
Once the seeds have sprouted and shown their first real leaf, transfer them to a seed tray or pot with drainage holes. Cover the tray with a plastic sheet to maintain humidity, but make sure to remove the cover once the first leaves appear.
Nurturing Clivia Seedlings: A Game of Patience
At this point, the hardest part is over, but you’ll still need to give your seedlings plenty of care. Place the pots in an area with diffused light, so they get enough warmth without direct sunlight frying the young plants.
Once your clivias are settled in, keep in mind that they’re not speed demons. It can take anywhere from 2 to 4 years for your plants to bear their first blooms. But remember: gardening is a marathon, not a sprint. The vibrant flowers that eventually pop up are well worth the wait!
| Germination and Growth Stages | Timeline | Care Instructions |
| Seed Germination | 2–3 weeks | Keep in sealed plastic bags with high humidity and warmth |
| First Real Leaf Appears | Around 1 month | Transfer to seed trays, cover with plastic, place in diffused light |
| First Blooms | 2–4 years after planting | Regular watering, keep in bright, indirect light |
Final Thoughts: The Joy of Growing Your Own Clivia
There’s something incredibly fulfilling about harvesting and germinating clivia seeds. Watching a tiny seed grow into a lush, flowering plant is one of those small joys in life that makes gardening so rewarding. Yes, it takes time, and yes, it requires patience—but the vibrant orange flowers that brighten my garden each year make it all worth it.
By following these steps, you’ll soon have your own little corner of clivia sunshine. So, roll up your sleeves, grab those seeds, and get planting. Before you know it, your garden will be blooming with clivia, and you’ll be basking in the glow of your gardening success.