Choosing the Best Hydroponic Reservoirs for Your System [+ DIY Tank Tips]
Look around a while and you’ll hear the same thing – “the hydroponic nutrient tank is the heart of the system.”
While we argue that the circulation pump serves as a better example of a heart, the nutrient tank is indeed a vital component. Whether you call it a tank or a reservoir, you are going to need one to hold all of the nutrient solution you intend to deliver to your hydroponic garden.
You can find pre-molded hydroponic reservoirs that are manufactured specifically for the job. This option will cost you a little more than the DIY route, but can be preferable to those gardeners that want an immediate and presentable setup.
Botanicare 707135 reservoir, 20 Gallon
These nutrient tanks are molded in such a way that you can easily mount them in specially-built tray stands. Paying attention to what you’re getting can result in a modular system that is easy to reposition. This makes it easy to move your garden’s location or even change hydroponic gardening methods without buying any new equipment!
Fast Fit 706121 Tray Stand, 3′ x 3′
By combining this nutrient reservoir with the hydroponic garden table, one could easily grow 9-12 plants, depending on the species.
If the gardener wanted, multiple tables in a greenhouse or LED grow room could quickly lead to a successful commercial operation. Likewise, a table could easily fit in a corner of a garage, greenhouse, or office. This is for a hydroponic gardening hobbyist wanting an easy-to-install setup.
What is a Hydroponic Reservoir Tank?
A hydroponic nutrient reservoir is a watertight vessel. It holds your mixed solution until it is delivered to your plants. If your plants were in soil, you would simply moisten the substrate (the dirt) with your mixed solution.
Hydroponic gardeners, however, are trying to maximize their plants’ growth.
The science has been so thoroughly discussed that it is now common knowledge amongst gardeners and horticulturists alike that hydroponic gardens offer quicker growth and larger yields over soil. It is generally the startup costs that deter the would-be hydroponic farmer from reaping the benefits of a hydroponically grown crop.
Buy vs. DIY
Depending on the garden you want and your own mechanical aptitude (or that of friends that you trust! ), buying the components and assembling them into a functioning hydroponic garden might be the better option. Everything fits together, and if you feel lost, there’s always the “1-800” number you can call.
However, if the costs are the only thing holding you back from trying hydroponic gardening, then you really need to keep reading. We are going to break down how to prepare your own nutrient tank out of materials most people have laying around or can find for cheap or even free!
Let’s quickly examine some of the benefits associated with buying compared to doing it yourself:
Buying Pre-Built Reservoirs vs. Building a DIY Nutrient Tank
| Pre-Built Reservoirs is Easy to install, but add to startup costsMaterials for DIY builds can be bought cheaply or found free in many casesUsually modular designed to fit to industry standard equipmentIt can require more advanced crafting skills to achieve modular integration with DIY reservoirs; precision is necessary Made from light filtering microbe-resistant plastics that can reduce disease, root rot, and algae. | DIY materials require vigorous cleaning and disinfecting before use; (you still need to wash pre-built) |
| “Plug-and-Play” modular design and fast shipping mean you can get up and running sooner. Instructions included. | DIY can be built quickly, but first-timers can become overwhelmed and it can take longer. A good plan helps. |
| Gardeners that lack confidence in their ability to craft a professional looking product can have peace-of-mind. | Beauty and function do not necessarily overlap; just because a building works does not mean it looks professional. |
If it’s starting to look like buying is the right choice for you, you’re not alone!
Hydroponic gardening has become very popular in recent years. Several companies now sell quality, affordable products. If you’re looking for a particular shape, size, or kind of hydroponic nutrient reservoir, check out Hydrobuilder. They are a company out of northern California that has been a dominant supplier of hydroponic components since 2011, and probably have the widest variety of in-stock selections available domestically.
If you would rather save the $$$ and build your own, we understand completely. Read on and learn how to build your own nutrient tank and save the money for other parts of the system.
How Hydroponic Reservoirs Work
The reservoir, or “tank,” is essentially the primary component of any hydroponic gardening system. Maybe the nutrients are the really important part, but without a good, well-connected tank, you would lose too much nutrient solution to leaks, evaporation, and contamination.
The reservoir’s connection to and interaction with the rest of the system varies. It depends mostly on your system’s design. We will briefly review the most common hydroponic gardening methods. Then, we will examine how the reservoir interacts with the other nutrient delivery components.
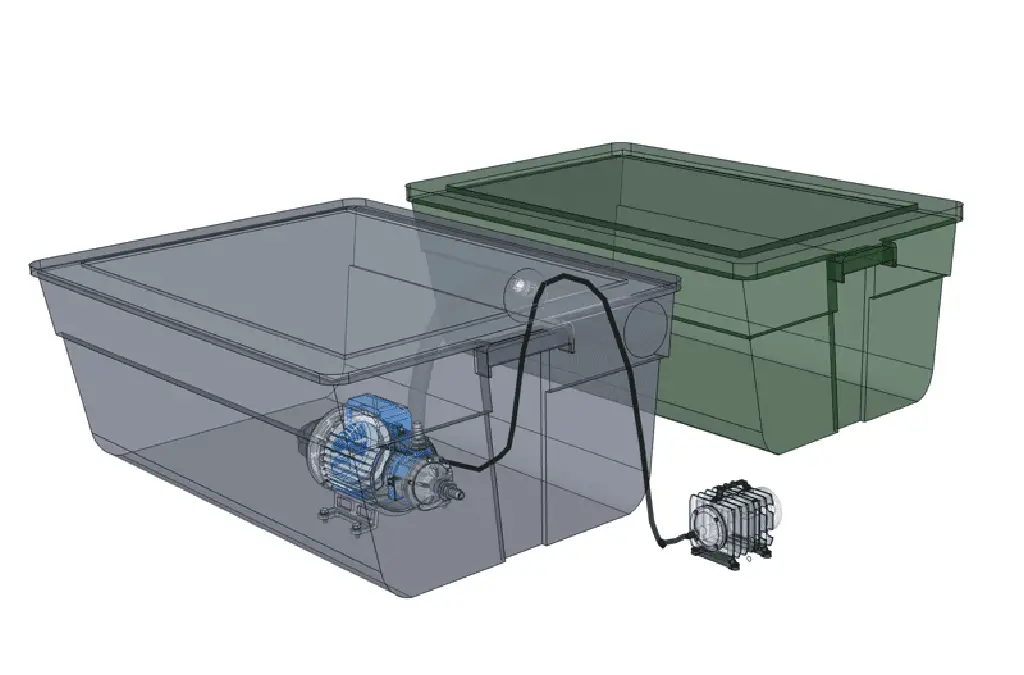
Ebb and Flow
Ebb and Flow systems are also sometimes referred to as “Flood and Drain” systems. Most commonly, this system will consist of two tanks located closely (usually the reservoir is beside or directly under the plant bed). Electric pumps transfer nutrient solution from the reservoir to the plant bed, bringing the bed’s level up to the plant roots. The system then slowly drains back down to the reservoir, allowing it to be recycled and reused. The reservoir can be adjacent if pumps are used and you have good tubing and good flow. Otherwise it’s better to place the reservoir under the beds and let gravity help out with drainage.
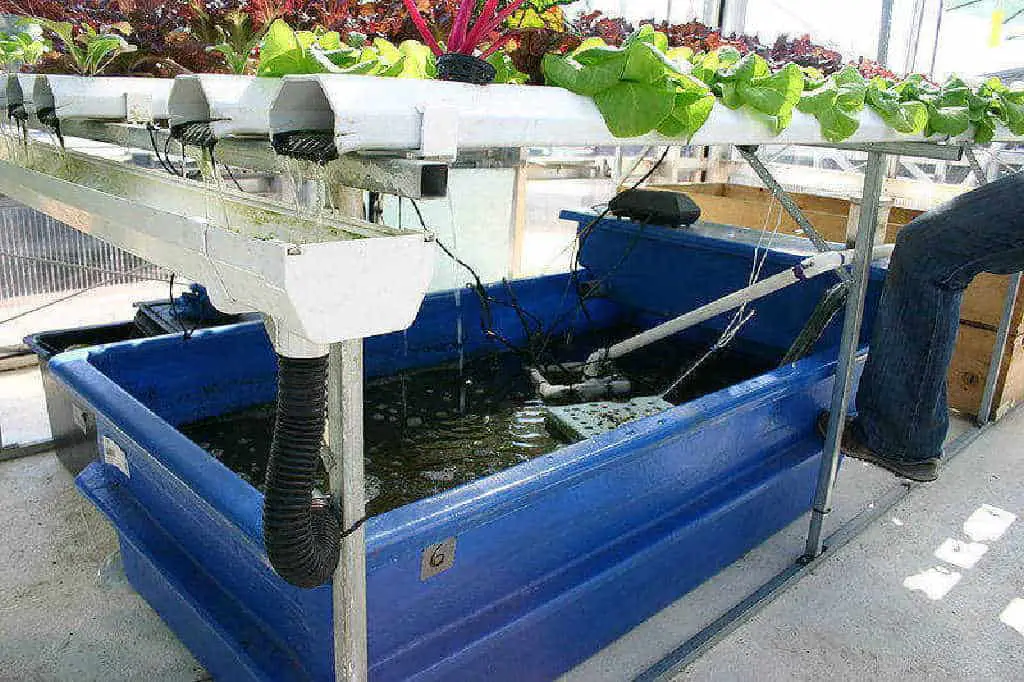
Nutrient Film Technique (NFT)
In the Nutrient Film Technique (NFT), the plant beds are most often placed in a straight line (such as in a piece of PVC pipe or plastic handrail) or in an “S” shape mounted to a wall or A-Frame.
Nutrient solution is circulated like an ebb and flow system. But, instead of flooding and draining, it flows in a stream that just touches the root tips. The nutrient solution creates a mist inside the plant bed. It coats the exposed roots in a film of nutrient-rich liquid that drips back down the roots.
This allows for optimal nutrient and oxygen absorption by the roots. The reservoir can be located anywhere that is convenient to access and pipe in.
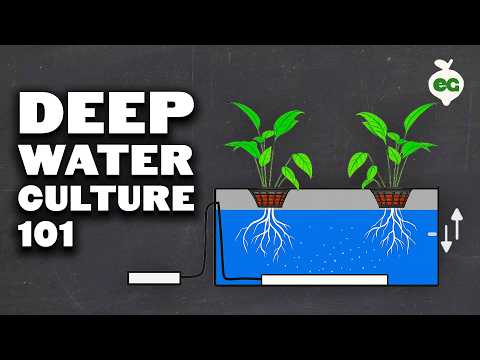
Deep Water Culture (DWC)
Deep Water Culture can be one of the most economical methods, commonly achieved using two 5-gallon buckets and an airstone. The bottom bucket is the reservoir, while the top bucket holds the plant. The roots hang down into the solution while the airstone provides the necessary aeration for the oxygen the roots need. While any plants can be grown using this method, it is common to see larger bushes, trees, and herbs grown this way.
Drip
It is also common to place the reservoir underneath the plant bed in a drip system. This system uses tubing to carry a nutrient solution to the grow medium. It saturates the medium (rockwool, perlite, etc.) and drips down to the roots. The solution then drips into a collector that returns it to the reservoir. Side Note: The build in the video above can easily be made into an aeroponics system by using a smaller diameter nozzle to create a mist in the tank.
Wick
Wick systems require the reservoir to be directly under the plant bed, as they rely on a wicking material (usually wood or cord) to transfer nutrient solution up to the growing medium. This keeps the medium at a natural saturation level that is neither too little nor too much. A very low-maintenance setup.
| Related: Do You Need to Buy Special Seeds for Hydroponics? |
How Big Should My Hydroponic Reservoir Be?
The first things that you’ll want to consider (and you do need to consider them together) are the type of plants you want to grow, the number of them you want to grow, and their maximum size at maturity.
Pro Tip: You may want to add a little extra (.5” each side) to the mature size, as hydroponics is famous for producing larger plants with fuller yields.
The next thing you’ll want to consider is how much solution you need to be able to hold in your reservoir.
A loose “rule-of-thumb” that you can use to ensure you have the water you need is to provide:
A minimum of 2.5 gallons for each large plant
A minimum of 1.5 gallons for each medium plant
A minimum of .5 gallon for each small plant
Count up your plants, add together the requirements, and you now know how large a vessel you need for your reservoir.
For Example:
| Number of Plants Fed | Water Needed | |
| Small Plants (most flowers, herbs, succulents) | 2 | 5 Gallons |
| Medium Plants (veg., bushes, shrubs) | 6 | 9 Gallons |
| Large Plants (melons, squash, vining plants) | 4 | 2 Gallons |
| Total Water Needed in Reservoir: | 16 Gallons (min.) |
Please keep in mind that this is following a general rule that provides bare minimum requirements. It is OK to go over on your nutrient capacity, and is actually encouraged whenever possible.
Horticulturists at the University of Georgia spent quite a bit of time studying how plants consume water and how much water they need to survive as well as thrive.
Also, large plants need more room to grow. Check your clearances and research the species before you plant!
Some designs allow a central reservoir to feed several garden beds from one large tank. In our experience, it is better to use an individual reservoir for each plant bed.
As your experience, garden, and needs grow, you will start wanting to plant different things at the same time. This means each bed could need a different nutrient mix for optimal growth.
Dedicating a reservoir to each hydroponic grow bed early on lets you adjust that bed’s nutrients as needed.
How Do I Build a Hydroponic Reservoir?
Ah, the moment we’ve been waiting for! Just how do we build a reliable nutrient reservoir right here at home?
Building your own hydroponic reservoir is a simple, straightforward task.
It may be the most essential part of a hydroponic system, yet it can also be the most basic. It really is just a tank, after all.
The most important criteria is that it is watertight. Plastic containers are a popular choice among all growers. They come in many standard sizes and shapes.
If you have the budget for it, purchasing accessory components from a hydroponic supplier can offer peace-of-mind as well as tech-support. Buying a $10 bag of bulkhead fittings from a hydroponic supplier like Blumat or even Grainger or Fastenal justifies you calling and asking questions, should they arise.
Here are a few ideas:
- Re-use old fish tanks – just leak test first and keep in a safe location once installed.
- Plastic storage totes (make sure they are deep enough to provide the volume you need)
- Large diameter PVC pipe (a 6’ section of 10” PVC pipe holds almost 25 gallons and weighs 204 lbs., so a good stand is required).
- Plastic trash cans—30 gallon is a standard kitchen trash can.
- Those big blue plastic drums I’ve always heard called “pickle barrels” are around 50-55 gallons.
- Avoid using metal, as the minerals will speed up oxidation (rust). Yes, aluminum and stainless steel will oxidize too.
Pro Tip: Once you’ve found your perfect reservoir, you need to make sure it is clean. Even if it’s brand new, it could have oils from the MFG . process, so disinfect and clean every nook and cranny thoroughly. You can use a 50/50 solution of vinegar and water if chemicals are a concern (rinse at least 3 times with clean water, no matter what you use).
After you’ve made sure your new hydroponic nutrient tank is clean, you’ll need to leak test it. To do this, place it somewhere like a patio or in your backyard where it won’t damage anything if the worst should happen.
Fill your reservoir more than you would fill it with nutrients; all the way if possible, and leave overnight. Ideally, you can place it somewhere where it will be evident that it has leaked, such as on dry concrete or wood. If it is on a slight slope, the better, as leaking water will run, making it easier to see.
If your tank’s exterior is dry the next morning, congratulations! You now have a reservoir.
Now… to get the liquid from the reservoir to the plants…
Extra Components You May Need for Your Tank
Your new hydroponic reservoir may be the most important component in your setup, but by itself it is just a tote (or trash can, or whatever).
You’ll need a few attachments to make things work. What you need will vary based on the hydroponic gardening method you’ve chosen.
Hydroponic Nutrient Solution
If the reservoir is the most important part of your hydroponic garden, then nutrients are in second place arguing for a recount. Without good nutrients, you may be able to keep your plants alive, but survive is all they will do.
Hoses & Tubing
Tubing might seem simple. But, tubes and hoses are the “veins” of your hydroponic garden. They carry the nutrient solution to your plants.
Most hydroponic builds will recommend which type of tubing to use in a given application, but if you’re having trouble, start with sections of a regular garden hose and 3/16” aquarium tubing (8 mm).
It is important that you use opaque tubing whenever you can, as sunlight can stimulate the growth of certain algae that can leech off of your nutrients. If you only have clear tubing available, simply use a 1” or similar diameter pvc pipe as a conduit. Simply thread the tubing through the pvc and use strapping to mount the pvc wherever works for your space.
What Temperature Should My Hydroponic Reservoir Be?
At its most basic level, the warmer a solution is, the less oxygen it can provide a plant.
Ideally, hydroponic solutions should be kept at 65℉ to 68℉ for optimal nutrient and oxygen uptake, though temperatures as warm as 85℉ can allow for healthy growth in some species.
Most professional and commercial hydroponic gardeners utilize chillers in their systems. This is due to the solution absorbing heat from many sources. These include circulation pumps, LED grow lights, and climate-controlled environments. Chillers will most often be rated by horsepower (HP) and their flow rate, which will usually be provided in gallons per hour (GPH) or liters per hour (L/hr).
By contrast, if you have an outdoor greenhouse running hydroponic garden beds in a colder climate, you may need to install heaters. Water heaters are rated in Watts (W). The ones used in hydroponic systems are just bigger versions of common submersible aquarium heaters.
You can find a great reference here that breaks down when you need a chiller (or heater), and what size to get.
How Do You Keep a Hydroponic Reservoir Clean?
Sooner or later, people occur upon the question, “Will I need to clean my nutrient tank?”
Yes. Yes, you absolutely should. Over time, other forms of life will discover your hotbed of nutrition – forms of life such as algae, bacteria, molds, and fungi. Not only are these lifeforms potentially dangerous to human health, but they can be absolutely fatal to your entire garden. Root rot is real, and it stinks.
The easiest way to keep your system clean is to keep it moving. It’s not just your tank that is susceptible, but your irrigation lines, your manifolds, your garden beds – even net pots can get slimy and gross. Stagnation is a precursor to mildew and algae, and a good, strong pump can do wonders for keeping a system in top shape.
Monitoring the water level, pH, and electrical conductivity (EC) in the reservoir is essential to determining when to change the nutrient solution for your exact setup. Measuring the EC lets you know the concentration of mineral nutrients in your solution by checking their conductive strength. The more minerals, the more conductive the solution.
It is standard to drain and flush your nutrient solution at the same time as your total replacement of it.
Let’s imagine a hypothetical nutrient reservoir of, say, 20 gallons. Your plants will consume some of the hydroponic solution, and a small amount may evaporate, so we will say you lose 3.5 to 4 gallons every week.
If you mix up and add nutrient solution each week to replace what is used, after 5-6 weeks you will essentially have replaced your entire 20 gallons of original solution.
Still with me?
At this point, most experienced hydroponic gardeners will drain the system. They will then sterilize it with algicides, moldicides, and virucides. After that, they will flush it thoroughly with clean water. Dispose of the old solution in your favorite flower bed or outdoor garden and fill your system back up with clean water (do not recycle solutions that show signs of contamination).
Get the pH tested and set, then check the EC so you have an idea of which nutrients you need. Mix up the new solution, and you’re back in business. You won’t worry about the nasty things that can happen in the dark corners of your hydroponic garden.
To reiterate, using our 20 gallon example tank above, you would drain and replace the nutrient mix every 5-6 weeks.